Panopto: Manage Recordings
The following guides are intended for instructors and staff at Georgetown.
- Edit a Recording
- Create Panopto Quizzes
- Create a Playlist of Recordings
- Add Closed Captions to a Recording
- Copy or Move Recordings
- Download a Panopto Recording
- View Playback Statistics
Edit a Recording
Panopto recordings can be edited by the creator(s) after they’ve been uploaded to Georgetown’s Panopto website.
We recommend you go through your Canvas course to edit Panopto recordings. If you are not planning to use Panopto in Canvas then you can login to the Georgetown Panopto website to edit a recording.
If you’d rather edit a recording prior to making it available to students in Canvas, please see our Publish Recordings guide.
To edit a recording in Panopto:
- Login to Canvas.
- Navigate to your course site that has the recording you wish to edit.
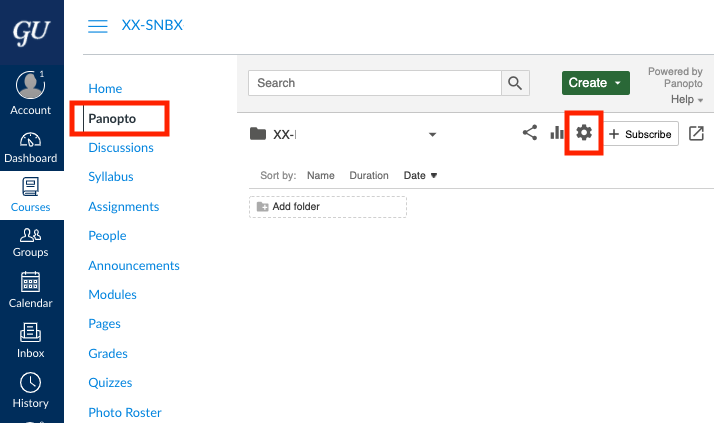
- Click the Panopto button on the Canvas course menu.
- Mouse over the recording you want to edit, and click the “pencil” icon or ‘Edit’ button.
- Then, follow Panopto’s instructions on how to edit a Panopto recording.
Create Panopto Quizzes
Owners (creators) of Panopto recordings have the ability to add quiz questions at any point during video playback. The Panopto recording has to be uploaded to the Georgetown Panopto website first before quiz questions can be added.
We recommend creating Panopto quizzes through your Canvas course. If you are not planning to use Panopto in Canvas then you can login to the Georgetown Panopto website to create quizzes.
To create a quiz in Panopto:
- Login to Canvas.
- Navigate to your course site that has the recordings you wish to add quiz questions.
- Click the Panopto button on the Canvas course menu.
- Mouse over the recording you want to add quiz questions, and click the “pencil” icon or ‘Edit’ button.
- Then, follow Panopto’s instructions on how to add a quiz to a recording.
OPTIONAL: Have your Panopto quiz grades sync with your Canvas course gradebook.
Note: You must create the quiz following the guide above before you can setup grade sync.
- Navigate to your course site that has the Panopto video quiz.
- Create a new Assignment and select the option to use an ‘External tool’ submission type.
- On the list of external tools, choose ‘Panopto Video Quiz’
- Select the video that has the quiz
- Complete the Canvas assignment settings by entering total points, due date, etc.
- Save or save and publish the assignment.
Create a Playlist of Recordings
Playlists allow recordings within your Panopto account to be presented in a single, ordered list even if those recordings exist in different Panopto folders. See our FAQ on Panopto Folders for more information about the different types of folders in Panopto.
We recommend creating Panopto playlists from your Canvas course. That way, the playlist will automatically be shared with students in the course, and there is no need to manually enter student names/emails in order to share the playlist. If you are not planning to use Panopto in Canvas then you can login to the Georgetown Panopto website to create playlist.
To create a playlist in Panopto:
- Login to Canvas.
- Navigate to a course where you want to create a Panopto playlist.
- Click the Panopto button on the Canvas course menu.
- Then, follow Panopto’s instructions on how to create a playlist.
Anytime you add, move/copy, remove, reorder, or change anything with your playlist you will need to re-sync it. This will be apparent if users report the following error message:
“This playlist has no sessions you can view“
To Sync a playlist in Panopto:
- Locate the Panopto playlist in question.
- Mouse over the playlist.
- Click the ‘Settings’ button that appears below the playlist.
- Click the ‘Access’ button that appears on the left side of the ‘Settings’ page.
- If the playlist needs to be synced a “Synchronize Access” button will appear on the page. If no button appears then access is already synchronized for all sessions in this playlist.
Add Closed Captions to a Recording
Owners (creators) of Panopto recordings can add Automatic Speech Recognition (ASR) captioning, which is also referred to as Automatic Machine Captions, AI captions or audio transcripts to their Panopto recordings.
Note: Closed Captions and ASR captions are off by default in Panopto.
Panopto’s ASR captions are legally considered transcripts and not captions. These are not the same as human generated captions and are at best 80% accurate. After adding ASR captioning we highly recommend you review and edit them for accuracy.
If you require ADA compliant captions in Panopto please reach out to Georgetown University’s Academic Resource Center for more information.
Enable ASR captioning on a folder in Panopto:
Enabling ASR captions on a folder will automatically apply ASR captions to any new recordings uploaded, copied, or moved to the folder. If the folder already contains recordings, enabling ASR captions on a folder will not retroactively apply ASR captions to existing recordings, and you will need to follow the steps outlined below to add ASR captions on a recording-by-recording basis.
- Login to the Georgetown Panopto website.
- Locate the folder you want to add ASR Captioning.
- Then, follow Panopto’s instructions on how to Enable ASR Captioning Per Folder.
Add ASR captions to a single recording in Panopto:
- Login to the Georgetown Panopto website.
- Locate the recording that you want to add captioning.
- Mouse over the recording and click the “pencil” icon or ‘Edit’ button.
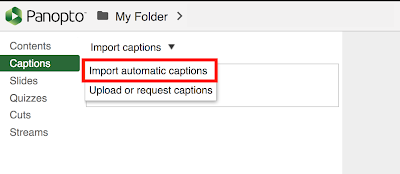
- In the editor window, click the ‘Captions’ button on the left side of the screen.
- Click on the ‘Import captions’ drop down menu.
- Click ‘Import automatic captions’.

- (Optional) Click on the text to edit or delete the auto generated transcript.
- Click ‘Apply’ at the top of the editor window to save.
Copy or Move Recordings
We recommend you use Canvas to access Panopto and copy/move your recordings. Using the copy method outlined below will ensure any existing viewer analytics, discussions and notes that were created within the Panopto playback window are NOT copied to the new course.
If you are not using Canvas and want to copy/move recordings from one Panopto folder to another then login to the Georgetown Panopto website, and follow these specific steps to move/copy Panopto recordings. Using this move/copy method will copy any included viewer analytics, discussions and notes that were created within the Panopto playback window.
Playlists cannot be copied, but can be moved from one Panopto folder to another. If you opt to move a playlist please remember to re-sync the playlist. See our playlist guide for details.
Following the copy method outlined below will take time to process, and processing time is dependent on the volume of files you have in the original folder. Processing time typically takes about 30 minutes to 1 hour.
If you have embedded Panopto recordings within Canvas pages or in Canvas Modules we recommend you first perform a Canvas course copy, AND then follow the method outlined below.
To copy or move recordings in Panopto:
- Login to Canvas.
- Enable Panopto in the Canvas course(s) where you want the recordings to appear.
- Click the Panopto button on the course menu where you want the recordings to appear.
- Click the “gear” icon on the upper right side of the screen to open the Panopto course folder Settings.

- Then, follow Panopto’s instructions on Manually Copying Panopto Course Content in Canvas.
Download a Panopto Recording
By default, students are not permitted to download Panopto recordings.
Owners (creators) of Panopto recordings (and co-instructors, TAs, Designers in Canvas) can download recordings or audio streams of Panopto recordings as MP4s. This might be helpful in cases where you want to upload them somewhere else or edit them using an external video editor.
If you are not planning to use Panopto in Canvas then you can login to the Georgetown Panopto website and go to step 4 to download Panopto recordings.
To download a recording in Panopto:
- Login to Canvas.
- Navigate to your course site that has the recordings you wish to download.
- Click the Panopto button on the course menu.
- Locate the recording you want to download, mouse over the video thumbnail (image), and click the ‘gear’ icon or ‘Settings’ button.

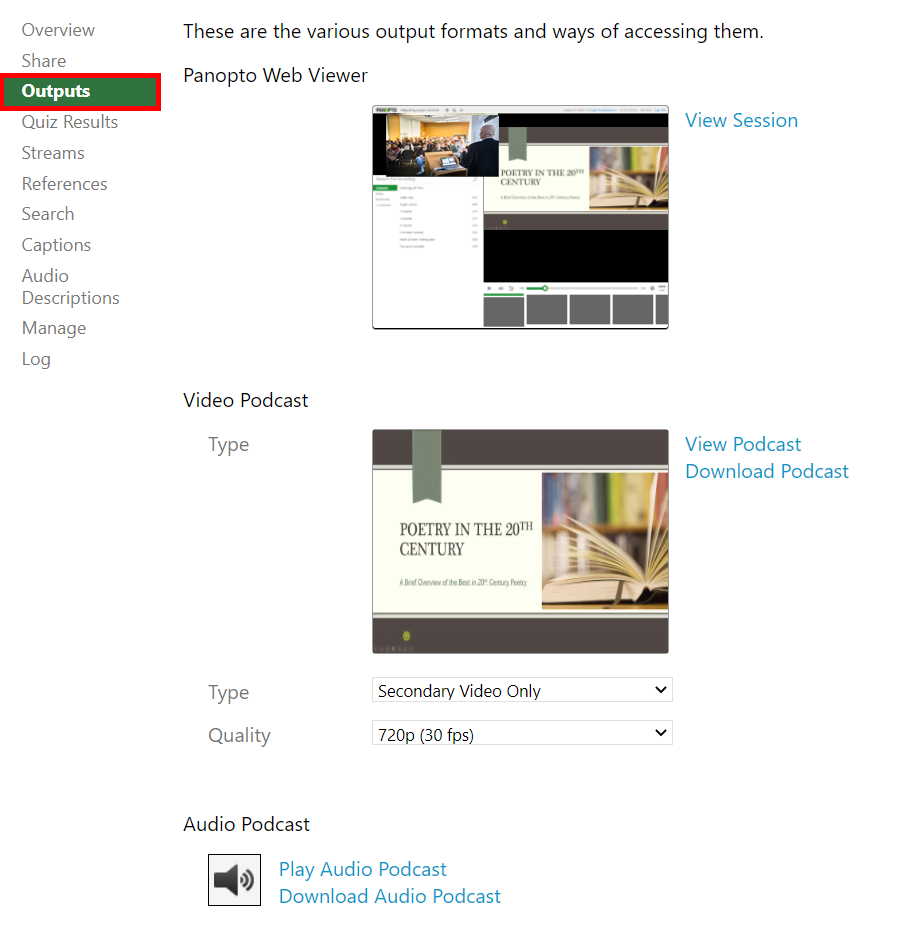
- In the Settings window, select the ‘Outputs’ tab from the left-hand navigation.

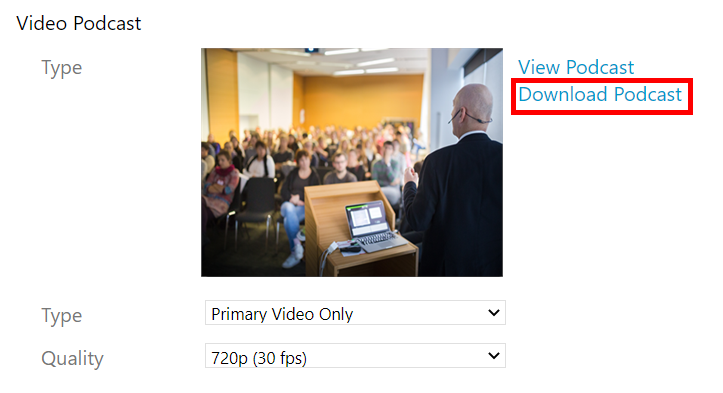
- Next to the ‘Video Podcast’ heading you will find the ‘Download Podcast’ button. Click this button to download the .mp4 of the video.

- (Optional) Underneath the ‘Video Podcast’ heading are dropdown menus to adjust the “Type” and “Quality” of the video podcast. Note: Changing the podcast type or quality will cause the video podcast to reprocess. You won’t be able to download it immediately when this happens. The length of time for processing depends on the length of the video. For more information on the Type and Quality options please see section 1.3 on Panopto’s support page for details.
View Playback Statistics
Owners (creators) of Panopto recordings (and co-instructors, TAs, Designers in Canvas who can access the Panopto course folder) can view statistics on shared recordings. Typical stats include the following:
- NetID
- Name
- Views
- Minutes Delivered
- Average Minutes Delivered
If you are not planning to use Panopto in Canvas then you can login to the Georgetown Panopto website and go to step 5 to view playback statistics.
To view playback statistics in Panopto:
- Login to Canvas.
- Navigate to the course where you want to view recording statistics.
- Click the Panopto button on the Canvas course menu.
- Mouse over the recording and click the graph icon or Stats button.
- Then, follow Panopto’s instructions on how to view Panopto analytics.
Don’t see what you’re looking for or need help?
Check out the Panopto FAQs or Support and Training page to get help.
